Livewire v3 introduced Form Objects to offload the field logic from the Component. In this tutorial, we'll build the create/edit modal forms powered by the Wire Elements package and reuse the same Livewire component and Form Object.

Preparation: Laravel Project
For the Laravel project visual design, we will use our own starter kit Laravel Breeze Pages Skeleton.
In the Model Product we will have two DB fields: name and description.
database/migrations/xxx_create_products_table.php:
public function up(): void{ Schema::create('products', function (Blueprint $table) { $table->id(); $table->string('name'); $table->text('description'); $table->timestamps(); });}app/Models/Product.php:
class Product extends Model{ protected $fillable = [ 'name', 'description', ];}Install Livewire and Customize Breeze
First, of course, we need to install install Livewire.
composer require livewire/livewireNext, because Alpine.js is baked into the core of Livewire, we need to remove it from our Breeze-powered skeleton. If you don't use Laravel Breeze, you can skip this step.
resources/js/app.js:
import './bootstrap'; import Alpine from 'alpinejs'; window.Alpine = Alpine; Alpine.start(); And recompile assets.
npm run prodThe last thing is changing the main layout path.
Livewire looks for a layout in resources/views/components/layouts/app.blade.php, but our Breeze-based Starter kit has it in a different place, so we need to set it in the Livewire config.
php artisan livewire:publish --configconfig/livewire.php:
return [ // ... 'layout' => 'components.layouts.app', 'layout' => 'layouts.app', // ...];And that's it, we can use Livewire in our project. Now, let's create a Livewire component to show the products list.
Livewire Component: Products List
php artisan make:livewire ProductListapp/Livewire/ProductList.php:
use App\Models\Product;use Illuminate\Contracts\View\View; class ProductList extends Component{ public function render(): View { return view('livewire.product-list', [ 'products' => Product::all(), ]); }}Next, let's add a Route leading to that Livewire component. We will use it as a full-page Livewire component, without Laravel Controller:
routes/web.php
use App\Livewire\ProductList; // ... Route::get('products', ProductList::class)->name('products');Let's add a link to the navigation and show the products table.
resources/views/layouts/navigation.blade.php:
// ... <div class="hidden space-x-8 sm:-my-px sm:ml-10 sm:flex"> <x-nav-link :href="route('users.index')" :active="request()->routeIs('users.index')"> {{ __('Users') }} </x-nav-link> <x-nav-link :href="route('products')" :active="request()->routeIs('products')"> {{ __('Products') }} </x-nav-link> </div> // ...resources/views/livewire/product-list.blade.php:
<div> <x-slot name="header"> <h2 class="text-xl font-semibold leading-tight text-gray-800"> {{ __('Products') }} </h2> </x-slot> <div class="py-12"> <div class="mx-auto max-w-7xl sm:px-6 lg:px-8"> <div class="overflow-hidden bg-white shadow-sm sm:rounded-lg"> <div class="p-6 overflow-hidden overflow-x-auto bg-white border-b border-gray-200"> <div class="min-w-full align-middle"> <table class="min-w-full border divide-y divide-gray-200"> <thead> <tr> <th class="px-6 py-3 text-left bg-gray-50"> <span class="text-xs font-medium leading-4 tracking-wider text-gray-500 uppercase">Name</span> </th> <th class="px-6 py-3 text-left bg-gray-50"> <span class="text-xs font-medium leading-4 tracking-wider text-gray-500 uppercase">Description</span> </th> <th class="px-6 py-3 text-left bg-gray-50"> </th> </tr> </thead> <tbody class="bg-white divide-y divide-gray-200 divide-solid"> @forelse($products as $product) <tr class="bg-white"> <td class="px-6 py-4 text-sm leading-5 text-gray-900 whitespace-no-wrap"> {{ $product->name }} </td> <td class="px-6 py-4 text-sm leading-5 text-gray-900 whitespace-no-wrap"> {{ $product->description }} </td> <td class="px-6 py-4 text-sm leading-5 text-gray-900 whitespace-no-wrap"> {{-- Edit Button --}} </td> </tr> @empty <tr class="bg-white"> <td colspan="3" class="px-6 py-4 text-sm leading-5 text-gray-900 whitespace-no-wrap"> No products found. </td> </tr> @endforelse </tbody> </table> </div> </div> </div> </div> </div></div>
Modal with Form Object
Now, let's create a component that will be a modal and use Form Object for properties, validation, etc.
php artisan make:livewire ProductModalphp artisan livewire:form ProductFormWe will use a package wire-elements/modal for modal.
composer require wire-elements/modal:^2.0To make a Livewire component as a modal, it needs to extend LivewireUI\Modal\ModalComponent instead of Livewire\Component.
app/Livewire/ProductModal.php:
use Livewire\Component;use Illuminate\Contracts\View\View;use LivewireUI\Modal\ModalComponent; class ProductModal extends Component class ProductModal extends ModalComponent { public function render(): View { return view('livewire.product-form'); }}And let's add a form to the Blade file.
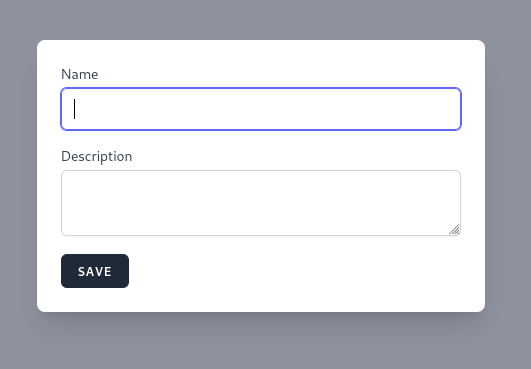
resources/views/livewire/product-form.blade.php:
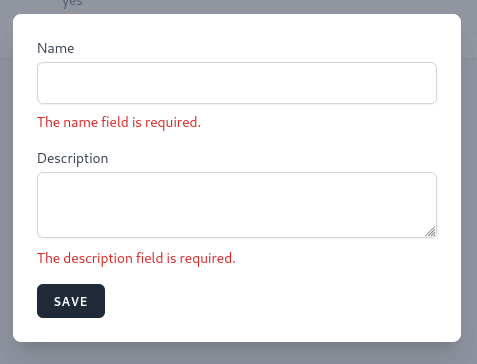
<div class="p-6"> <form wire:submit="save"> <div> <x-input-label for="name" :value="__('Name')" /> <x-text-input id="name" class="mt-1 block w-full" type="text" /> </div> <div class="mt-4"> <x-input-label for="description" :value="__('Description')" /> <textarea id="description" class="mt-1 w-full rounded-md border-gray-300 shadow-sm focus:border-indigo-500 focus:ring-indigo-500 dark:focus:border-indigo-600"></textarea> </div> <div class="mt-4"> <x-primary-button> Save </x-primary-button> </div> </form></div>Notice: we're reusing Blade components like x-text-input and x-primary-button from the default Laravel Breeze.
Next, we need buttons to open a modal.
resources/views/livewire/product-list.blade.php:
// ... <x-primary-button wire:click="$dispatch('openModal', { component: 'product-modal' })" class="mb-4"> New Product</x-primary-button> // ...@forelse($products as $product) <tr class="bg-white"> <td class="px-6 py-4 text-sm leading-5 text-gray-900 whitespace-no-wrap"> {{ $product->name }} </td> <td class="px-6 py-4 text-sm leading-5 text-gray-900 whitespace-no-wrap"> {{ $product->description }} </td> <td class="px-6 py-4 text-sm leading-5 text-gray-900 whitespace-no-wrap"> <x-secondary-button wire:click="$dispatch('openModal', { component: 'product-modal', arguments: { product: {{ $product }} }})"> Edit </x-secondary-button> </td> </tr>@empty// ...After pressing the New Product button, we see an opened modal with the form inside.
Save a New Product
Now that we can open a modal, let's create and update a product.
First, we must add properties in the Form Object and bind them to inputs.
app/Livewire/Forms/ProductForm.php:
class ProductForm extends Form{ public string $name = ''; public string $description = '';}app/Livewire/ProductModal.php:
class ProductModal extends ModalComponent{ public Forms\ProductForm $form; // ...}resources/views/livewire/product-modal.blade.php:
<div class="p-6"> <form wire:submit="save"> <div> <x-input-label for="name" :value="__('Name')" /> <x-text-input id="name" class="mt-1 block w-full" type="text" /> <x-text-input wire:model="form.name" id="name" class="mt-1 block w-full" type="text" /> <x-input-error :messages="$errors->get('form.name')" class="mt-2" /> </div> <div class="mt-4"> <x-input-label for="description" :value="__('Description')" /> <textarea id="description" class="mt-1 w-full rounded-md border-gray-300 shadow-sm focus:border-indigo-500 focus:ring-indigo-500 dark:focus:border-indigo-600"></textarea> <textarea wire:model="form.description" id="description" class="mt-1 w-full rounded-md border-gray-300 shadow-sm focus:border-indigo-500 focus:ring-indigo-500 dark:focus:border-indigo-600"></textarea> <x-input-error :messages="$errors->get('form.description')" class="mt-2" /> </div> <div class="mt-4"> <x-primary-button> Save </x-primary-button> </div> </form></div>For saving, we defined the save method in the wire:submit directive. The whole creating and updating logic will be in the Form Object. In the modal component we just need to call it.
app/Livewire/ProductForm.php:
class ProductForm extends Form{ public string $name = ''; public string $description = ''; public function save(): void { $this->validate(); Product::create($this->only(['name', 'description'])); $this->reset(); } public function rules(): array { return [ 'name' => [ 'required', ], 'description' => [ 'required' ], ]; }}We are validating inputs and creating a DB record.
app/Livewire/ProductModal.php:
class ProductModal extends ModalComponent{ public Forms\ProductForm $form; public function save(): void { $this->form->save(); $this->closeModal(); } // ...}After saving a product, we close a modal. And, of course, we need to refresh the table automatically.
app/Livewire/ProductModal.php:
class ProductModal extends ModalComponent{ public Forms\ProductForm $form; public function save(): void { $this->form->save(); $this->closeModal(); $this->dispatch('refresh-list'); } // ...}app/Livewire/ProductList.php:
use Livewire\Attributes\On; class ProductList extends Component{ // ... #[On('refresh-list')] public function refresh() {} }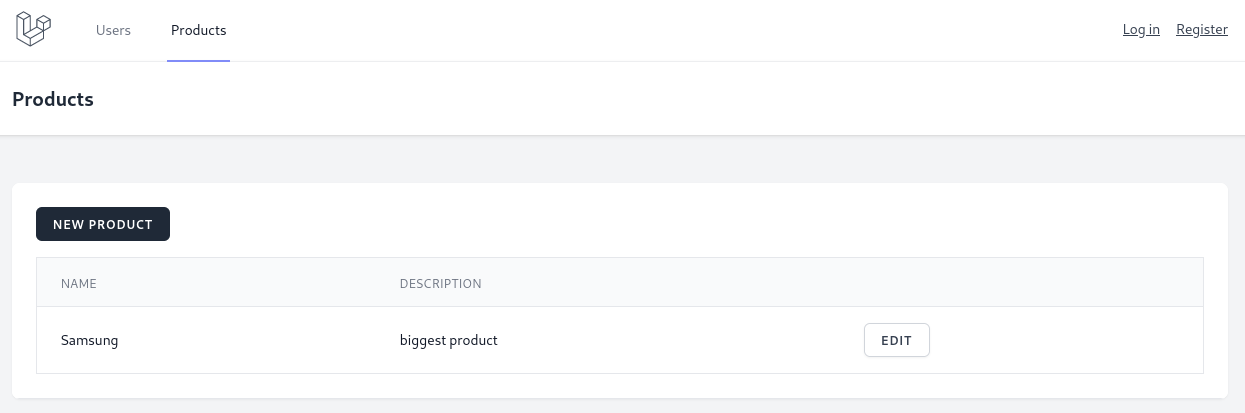
Product Edit: Form and Save Data
Now, let's add logic to edit the product. First, we need to set properties only if a product is passed.
app/Livewire/ProductModal.php:
use App\Models\Product; class ProductModal extends ModalComponent{ public ?Product $product = null; public Forms\ProductForm $form; public function mount(Product $product = null): void { if ($product->exists) { $this->form->setProduct($product); } } // ...}app/Livewire/Forms/ProductForm.php:
use App\Models\Product; class ProductForm extends Form{ public ?Product $product = null; public string $name = ''; public string $description = ''; public function setProduct(?Product $product = null): void { $this->product = $product; $this->name = $product->name; $this->description = $product->description; } // ...}For updating a record in the DB, we need to do a simple check and, based on it, create or update a record.
app/Livewire/Forms/ProductForm.php:
class ProductForm extends Form{ // ... public function save(): void { $this->validate(); if (empty($this->product)) { Product::create($this->only(['name', 'description'])); } else { $this->product->update($this->only(['name', 'description'])); } $this->reset(); } // ...}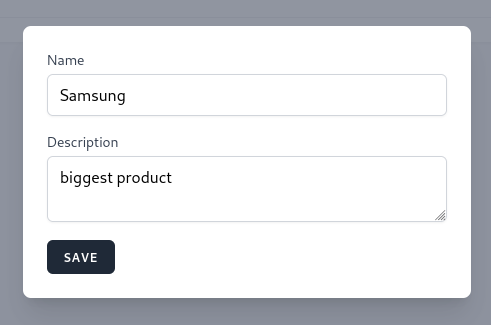
Now, we can create and update products using the same Livewire modal component and the same Form Object.
Making Name Unique
Now, let's add a unique rule for the product name.
app/Livewire/Forms/ProductForm.php:
use Illuminate\Validation\Rule; class ProductForm extends Form{ // ... public function rules(): array { return [ 'name' => [ 'required', Rule::unique('products', 'name')->ignore($this->component->product), ], 'description' => [ 'required' ], ]; }}The crucial part here is how to ignore record when editing a product. We can access properties from the component in the Livewire component using $this->component.
Extra Validation Tip: Prefix "form."
When validation rules are triggered now because we use Form Object, the attributes are called with a prefix of form.
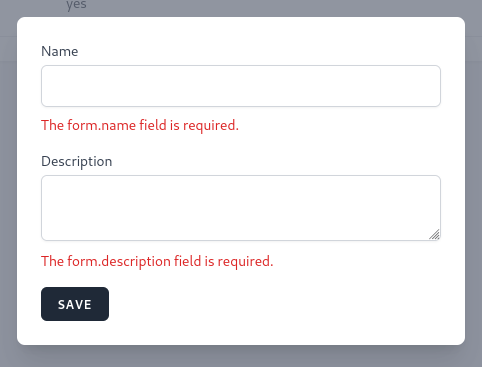
We can fix it by just adding a validationAttributes method.
app/Livewire/Forms/ProductForm.php:
class ProductForm extends Form{ // ... public function validationAttributes(): array { return [ 'name' => 'name', 'description' => 'description', ]; }}Now, they are shown as expected.
The full code can be found in the GitHub repository.
You may also be interested in our PREMIUM course Livewire 3 From Scratch
-front_grid.jpg)
-front_grid.jpg)
-front_grid.jpg)
The Git repo link is not working!
maybe mr pivolas forget to make it public. this repo are similar https://github.com/LaravelDaily/Livewire-3-Course-Demo
@adithyaricky your mentioned is public
Link is still not fixed.
https://github.com/LaravelDaily/Livewire-3-CRUD-Modal-Unique-Demo
I've identified errors in the tutorial, and my code isn't functioning correctly. I'd like to access the source code. Could you please correct the link as soon as possible?
Will be fixed today
Now it's public
i don't see the link for the video. Do you have video tutorial of this topic ?
Povilas have plenty videos on YouTube about livewire
Dear Povilas, I noticed an issue in your code within the
app/Livewire/ProductModal.phpfile. It appears that there is an incorrect view being used inside therender()method. Similarly, there seems to be a filename discrepancy inresources/views/livewire/product-form.blade.php, possibly causing issues.I cloned your code and tested the application, but it doesn't seem to open the modal as expected.
I've had a somewhat frustrating experience with the course "Livewire 3 From Scratch: Practical Course." As a result, I decided to jump into this CRUDy article to fill in the gaps in my understanding of Livewire. However, I found myself facing similar challenges with this article as well. I'm hoping there's a beginner-friendly CRUDy course available for Livewire v3 that can help me grasp the concepts more effectively. Thank you for your assistance!
Add
@livewire('wire-elements-modal')
inside the body section of resources/views/layouts/app.blade.php
resources/views/livewire/product-form.blade.php
should be kept as
resources/views/livewire/product-modal.blade.php
Can you show the navigation link when collapsed code also? The demo is fine on a computer but I have no links when on mobile?
You need to add them in the
navigation.blade.phpThe example shows the navigation but it didn't put it into the drop-link area.
Yes because we aren't building a full app. It's just to show a concept how to do something. If you need to links for mobile feel free to do that it's in the same
It appears that this step-by-step guide is missing some information. I'm not sure if it's intentional to encourage research and learning, or if it's simply an oversight. First, what are the routes? Are we using Controllers to call the Livewire pages/components, or are we calling them directly without the use of controllers? How are Data Models being passed to the view?
I am a subscriber to this website, but sometimes I struggle to make the examples work."
For this tutorial no contdollera are used this is a full page component. For data the route model binding is being used. Also the source code is available you can check
define route in web.php as Route::get('/products', ProductList::class)->name('products');
Can you please Redo this Tutorial using the 2.0.7 version of LivewireUI\Modal\ModalComponent I just can not get this Tutorial to work It is to outdated. not even your Github Repository will work for me.
This is a new tutorial only a month old and uses the 2.o.7 version of wire-elements/modal.
Hy! I would like to replace the listing section in the description with the Livewire PowerGrid listing. Is there a description available regarding this? Thank you.
No, we don't have any tutorials using powergrid. Maybe Povilas has a YouTube video. Just check their docs
Okay, thank you.
Will there be a solution for the delete function in the near future?
What do you need about it? Create a delete method and pass id to it. In that method delete. There are a couple livewire courses that do this.
Then in the title of the article in the CRUD acronym you need to remove the letter D :)
How to adjust the width or size of the modal
i have design here that table is horizontally scrollable how to make it reponsive
For modal refer to the docs of the package. For table you will need to learn CSS.
no matter what i do to my modal it will not change its width, do i need the pro version?
i already did public static function modalMaxWidth(): string { return '2xl'; }
Did you compile your assets after changin the width?
Keep in mind: With any css changes you need to run
npm run buildto compile them into "available" assets, otherwise - no class will be added.Just adding a method like that shouldn't change the width if tailwind doesn't compile that class. Check the docs this part https://github.com/wire-elements/modal#building-tailwind-css-for-production
fixed it, the problem is the minimum width not the maximum
having the same problem with modal width. how did you solve yours with minimum width ?
Refer to package documentation
Perhaps a general question about Laravel model methods, but how would one verify the $model->update() (or $model->save) / $model->delete() worked and then send that back to the Livewire component for confirmation?