Laravel Reverb is one of the newest first-party packages from the Laravel team. With Reverb, we can show page changes in real-time, like this message to users:
That message appears on the screen without refreshing the page or making API calls.
But how does it work? Let's dive into it, with first two practical examples:
- Sending a global message "The system will go down for maintenance"
- Sending a private message for a specific user "Your export is finished"
What is Reverb?
Reverb was created to solve the gap between back-end and front-end communications. It's a real-time messaging system that allows us to listen to back-end events and react to them on the front-end.
Here are a few examples of what we can do with Reverb:
- Build real-time notifications about new messages, comments, reports, or system events.
- Build real-time chat applications.
- Build real-time dashboards with live data.
- Inform users about changes in the system, such as new products, reports, etc.
- Create presence systems to show who is online and who is not.
- And many more...
It's a powerful tool that can be used in many different ways. The only limit is our imagination and creativity.
Why Reverb Instead of Periodical Refresh?
But why use Reverb instead of a simple API endpoint? We can call an API endpoint to get the latest data, right? And if we need to wait for something to finish, we can always use Polling, calling the server every minute or so, right?
Well, yes, we can. But we can also use a sword to cut our bread, right? But we don't. We use a knife. Why? Because it's more efficient and easier to use. It's the same with Reverb. Here's why:
With Polling, we send requests to the server every X seconds/minutes to check for new data.
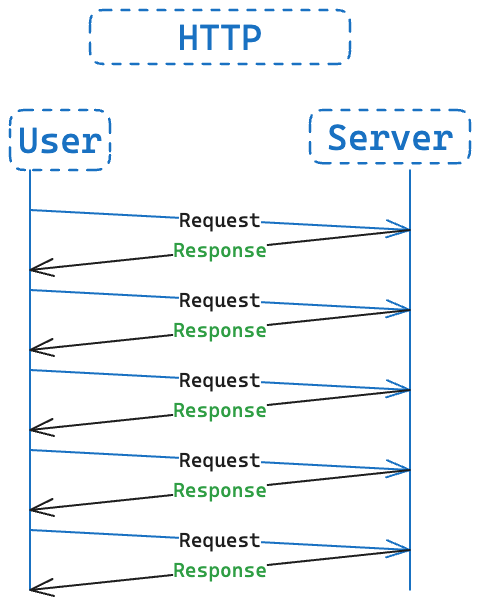
Sounds good. We solved the problem.
But what if we have 1000 users? And then 100 000 users? We will send N (number of users) requests every X seconds. That's a lot of requests!!!
Instead, with Reverb, we can send a single request to the server, and that's it!
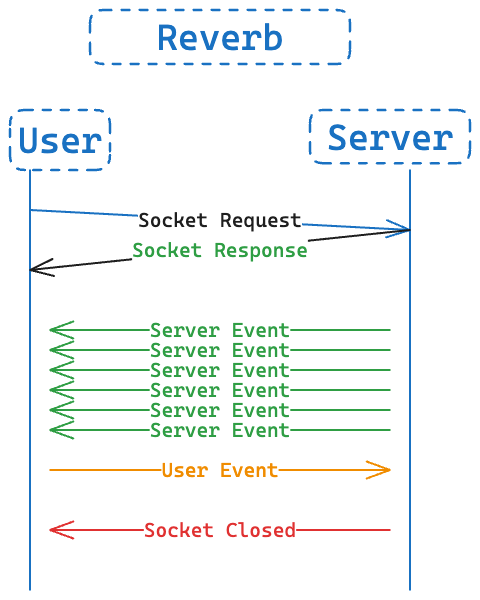
It's based on WebSockets. As shown in the image above, it will create a WebSocket connection between the server and the client.
This connection allows our server and client to communicate in real time without sending multiple requests. As long as the connection is open, we can freely send messages/data and avoid creating unnecessary requests that will slow down our server.
Reverb Alternatives?
Before Reverb, we had a few popular alternatives to build real-time applications in Laravel:
- Pusher - third-party service (paid) that allows us to build real-time applications.
- Laravel WebSockets - a package from BeyondCode (Now Archived)
- Soketi - alternative to Pusher, but free (self-hosted)
Reverb was created to simplify the process of configuration and owning that problem as a first-party package.
Now, let's see how we can use Reverb in our Laravel application.
Project Setup
We will use Laravel 11 for this tutorial with Breeze as our authentication system. From there, we have a simple "Dashboard" page:

From here, we will install Reverb and create a few simple real-time events to show how it works.
Installing Reverb
To install Reverb, we have to call this command:
php artisan install:broadcastingThis will ask us if we want to install Reverb, enter yes and press Enter.
Once the package installs, it will ask if we want Node dependencies installed. Enter yes and press Enter.
That's it! Reverb is installed and ready to be used. At this point, no more configuration is needed to use Reverb locally.
Reverb might not work in production or when you or your teammate clones a repository. The reason for that can be the BROADCAST_CONNECTION value in the .env. It must be set to reverb.
.env:
// ... BROADCAST_CONNECTION=reverb FILESYSTEM_DISK=localQUEUE_CONNECTION=database // ...Creating our First Event - Global System Maintenance
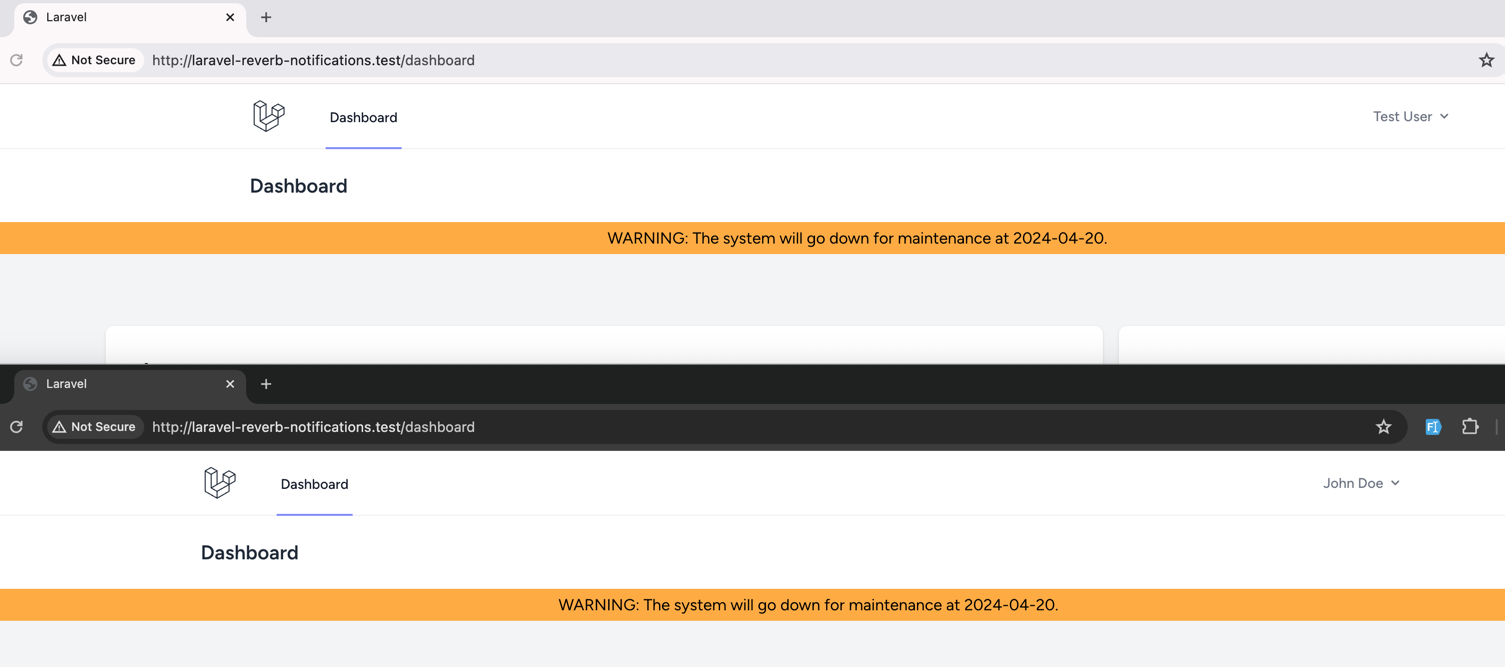
Our first event will be targeting all users in our system - we will send a "System maintenance" message to all users:
To create an event, we have to run this command:
php artisan make:event SystemMaintenanceEventThis will create a new event in our app/Events folder. We have to modify a few things in this file:
namespace App\Events; use Illuminate\Broadcasting\Channel;use Illuminate\Broadcasting\InteractsWithSockets;use Illuminate\Contracts\Broadcasting\ShouldBroadcast; use Illuminate\Foundation\Events\Dispatchable;use Illuminate\Queue\SerializesModels; class SystemMaintenanceEvent class SystemMaintenanceEvent implements ShouldBroadcast { use Dispatchable, InteractsWithSockets, SerializesModels; /** * Create a new event instance. */ public function __construct() public function __construct(public string $time) { // } /** * Get the channels the event should broadcast on. * * @return array<int, Channel> */ public function broadcastOn(): array { return [ new PrivateChannel('channel-name'), new Channel('system-maintenance'), ]; }}Then we have to modify our routes/channels.php file:
// ... Broadcast::channel('system-maintenance', function () { // Public Channel});We added a new channel to our broadcasting file. Next, we need to listen for this event on our front end:
resources/views/layouts/app.blade.php
{{-- ... --}} <script> window.addEventListener('DOMContentLoaded', function () { window.Echo.channel('system-maintenance') .listen('SystemMaintenanceEvent', (event) => { console.log(event) }); });</script></body></html>Then, we want to create a new command to trigger this event:
php artisan make:command SystemNotifyMaintenanceCommandAnd modify the command file:
app/Console/Commands/SystemNotifyMaintenanceCommand.php
use App\Events\SystemMaintenanceEvent;use Illuminate\Console\Command; class SystemNotifyMaintenanceCommand extends Command{ protected $signature = 'system:notify-maintenance'; protected $description = 'Command description'; public function handle(): void { $time = $this->ask('When should it happen?'); event(new SystemMaintenanceEvent($time)); }}Once this is done, we can run the Reverb server:
php artisan reverb:startThen, we need to open the dashboard page and trigger the event by calling the command. Once that is done, we should see the event in our console:

From here, we can do whatever we want with this event. In our case, we want to add a warning message to our dashboard:
resources/views/layouts/app.blade.php
{{-- ... --}} window.Echo.channel('system-maintenance') .listen('SystemMaintenanceEvent', (event) => { let location = document.getElementsByTagName('main')[0]; let div = document.createElement('div'); div.style.width = '100%'; div.style.height = '32px'; div.style.textAlign = 'center'; div.style.lineHeight = '32px'; div.style.background = '#ffab44'; div.innerHTML = 'WARNING: The system will go down for maintenance at ' + event.time + '.'; location.insertBefore(div, location.firstChild); }); {{-- ... ---}}Now, if we reload the page and trigger the event, we should see the warning message at the top of our dashboard:

That's it! We have created our first real-time event with Reverb!
But wait, this event was global and public. See in the top-right corner, I'm logged in with different users, and they both see the message.
This means our event was sent to all users in the system. But what if we want to send it to a specific user? Let's create a new event for that.
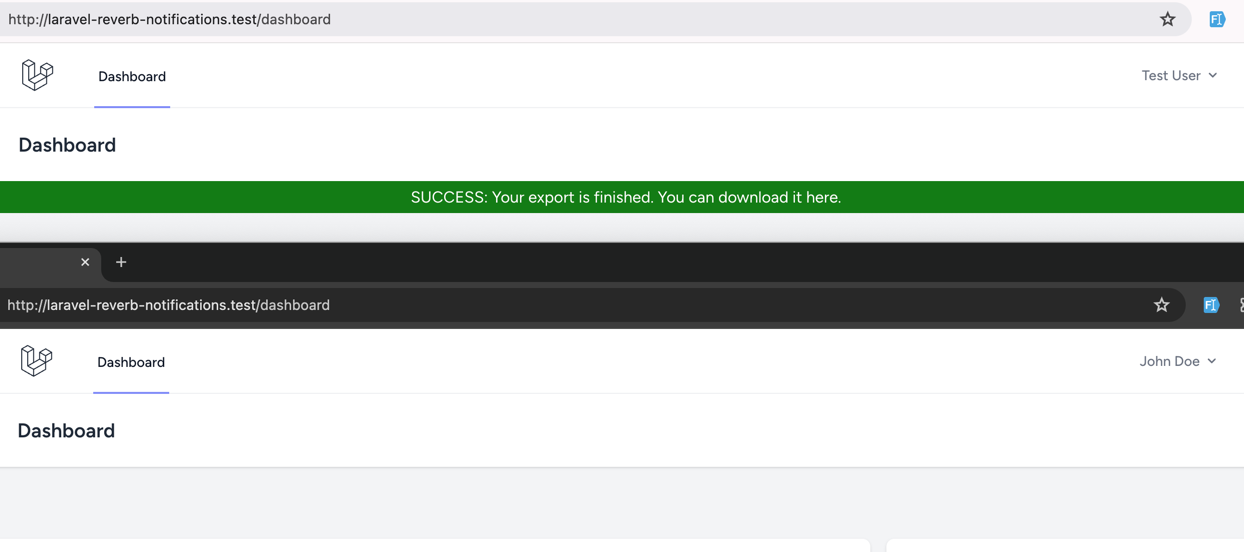
Creating a Private Event - Informing User About Finished Export
To create a private event, we will create a new event:
php artisan make:event ExportFinishedEventThen, we have to modify the event file:
namespace App\Events; use Illuminate\Broadcasting\Channel;use Illuminate\Broadcasting\InteractsWithSockets;use Illuminate\Broadcasting\PresenceChannel;use Illuminate\Broadcasting\PrivateChannel;use Illuminate\Contracts\Broadcasting\ShouldBroadcast; use Illuminate\Foundation\Events\Dispatchable;use Illuminate\Queue\SerializesModels; class ExportFinishedEvent class ExportFinishedEvent implements ShouldBroadcast{ use Dispatchable, InteractsWithSockets, SerializesModels; /** * Create a new event instance. */ public function __construct(public int $user_id) { // } /** * Get the channels the event should broadcast on. * * @return array<int, Channel> */ public function broadcastOn(): array { return [ new PrivateChannel('App.Models.User.'.$this->user_id), ]; }}This will create a new event in an existing channel - App.Models.User.{user_id}. Only the user with the specified ID will receive this event.
Note: This channel is created automatically by installing Reverb.
Then we want to build two things - a controller and a job to trigger this event:
php artisan make:controller StartExportControllerapp/Http/Controllers/StartExportController.php
use App\Jobs\ExportPdfDataJob; class StartExportController extends Controller{ public function __invoke() { dispatch(new ExportPdfDataJob(auth()->id())); return redirect()->back(); }}Then we have to create a job:
php artisan make:job ExportPdfDataJobapp/Jobs/ExportPdfDataJob.php
use App\Events\ExportFinishedEvent;use Illuminate\Bus\Queueable;use Illuminate\Contracts\Queue\ShouldQueue;use Illuminate\Foundation\Bus\Dispatchable;use Illuminate\Queue\InteractsWithQueue;use Illuminate\Queue\SerializesModels; class ExportPdfDataJob implements ShouldQueue{ use Dispatchable, InteractsWithQueue, Queueable, SerializesModels; public function __construct(public int $userId) { } public function handle(): void { sleep(5); event(new ExportFinishedEvent($this->userId, 'file.pdf')); }}Once this is done, we can listen for this event on our front end:
resources/views/layouts/app.blade.php
{{-- ... --}} window.Echo.private('App.Models.User.' + {{ auth()->id() }}) .listen('ExportFinishedEvent', (event) => { console.log(event) }); {{-- ... ---}}Now, if we trigger this event at the end of our export job, we can see it in our console:

From here, we can display a banner to the user that the export is finished:
resources/views/layouts/app.blade.php
{{-- ... --}} window.Echo.private('App.Models.User.' + {{ auth()->id() }}) .listen('ExportFinishedEvent', (event) => { let location = document.getElementsByTagName('main')[0]; let div = document.createElement('div'); div.style.width = '100%'; div.style.height = '32px'; div.style.textAlign = 'center'; div.style.lineHeight = '32px'; div.style.background = '#44ff44'; div.innerHTML = 'SUCCESS: Your export is finished. You can download it <a href="' + event.file_path + '">here</a>.'; location.insertBefore(div, location.firstChild); }); {{-- ... ---}}Now, if we trigger this event in our job, we should see the banner at the top of our dashboard:

And here's the beauty of this - only the user that triggered the event will see this banner. As you can see below, the other user does NOT see the message.
That's it! We have created a private event with Reverb!
The full repository with source is here on GitHub.
The following lessons will create more examples of private and public events.
Povilas, once again, congratulations on the content!
Could you and your team create specific examples for Filament using database notifications?Could you and your team create specific examples for Filament using database notifications? Thank you in advance for this! 😊
Can you expand on your request a little bit? I don't think that there is something complicated in database notifications there :)
Exactly what the people wanted! Cannot wait to delve into this thanks again!
After starting the reverb server I appear to get an error - anyone else having the same issue, I have cloned the github repo?
.env file is missing configurations... for whatever reason installation only added to real .env file and not into example!
I will update them in the morning (or you can find them by running the install command again)
I'll have to try again tomorrow - appear to have sorted the .env now by added the reverb env entries however now I seem to have this constantly in my Chrome browser console, I presume my local setup may require tweaking... I am using Herd currently (e.g all my dev urls end in .test)
This seems okay! It probably does not match the port in the .env file ( tho I did not test it on herd )
Weirdly it seems to be all connected now in the WS tab in Chrome but running the artisan commands did nothing... i'll wait for the updated repo and hopefully someone one using Herd can point me in the right direction
Hey, updated the repository to have .env.example filled with values that worked on my end! Hopefully this works (and you can compare it with what you put on!)
Hi, is it necessary to run
php artisan queue:listen? Because without it, it doesn't work.Hi, no, if you don't use queues. Change your .env driver from redis to
syncand it should start working againThank you very much for your response.
Hi. It's better if you put this in the content course because Laravel 11 comes with QUEUE_CONNECTION=database by default. It took me a while fixed it.
Cheers.
did you guys manage to get this working for you?
I followed exactly and even used the repo (generated a new key, changed from sqlite to mysql with the proper credentials and created a couple of users). I don't get the response as advertised. There are no errors in the console.
console.log(event);shows nothing.Have you launched reverb and a queue worker?
Not sure if I'm doing it right, but here's what I did:
could you run:
php artisan reverb:start --debug
and see what it outputs?
also, please check browser networks "ws" tab to see if it connected to sockets
Running php artisan reverb:start --debug outputs this:
The ws Messages:
It seems that the event is triggered and ws message is retrieved... but now I wonder why it did not update on the UI for you. There was no console logs for any error? Or maybe you have an adblocker running?
console.log(event) yielded nothing. No adblockers and even turned off firewall.
Hmm, this is weird. Last question then:
Is your .env configured correctly with the REVERB variables? If they are and you still need help - feel free to email us (mark in the email that it should be forwarded to Modestas) and I'll assist you there as much as I can :) (ps. Same can be done in our discord!)
try to use the simple notification and i see in console Cannot read properties of undefined (reading 'channel')
dis you compile your assets?
Yes, new laravel installation,
I would check that echo.js is loaded in the website assets and is correctly included
echo.js
import Echo from 'laravel-echo';
import Pusher from 'pusher-js'; window.Pusher = Pusher;
window.Echo = new Echo({ broadcaster: 'reverb', key: import.meta.env.VITE_REVERB_APP_KEY, wsHost: import.meta.env.VITE_REVERB_HOST, wsPort: import.meta.env.VITE_REVERB_PORT ?? 80, wssPort: import.meta.env.VITE_REVERB_PORT ?? 443, forceTLS: (import.meta.env.VITE_REVERB_SCHEME ?? 'https') === 'https', enabledTransports: ['ws', 'wss'], });
That wasn't what I was referring to, but also check if everything is wrapped in:
Because this is important.
In fresh installation i put the following in welcome.blade.php before the body close
<script> window.addEventListener('DOMContentLoaded', function () { window.Echo.channel('system-maintenance') .listen('SystemMaintenanceEvent', (event) => { console.log(event) }); }); </script>Okay, did you install the broadcasting package?
Yes i followed all steps and also run php artisan reverb:start
finally the error was i didnt have the following on head @vite(['resources/css/app.css', 'resources/js/app.js'])
But i see another error in console now wss://localhost:8080/app/3jxinlvwqfw6zd6q929e?protocol=7&client=js&version=8.4.0-rc2&flash=false failed: WebSocket is closed before the connection is established.
i get all the same problems
hy giuys have you solved the issue of reverb?
the event is triggered and ws message is retrieved... but I wonder why it did not update on the UI for me. There was no errors at console logs, what is the problem?
when write command :
Message Handled .............................................................................................................. 339232170.221969025 Pruning Stale Connections ........................................................................................................................ Pinging Inactive Connections ..................................................................................................................... Message Received ............................................................................................................. 339232170.221969025
1▕ {
2▕ "event": "pusher:ping",
3▕ "data": []
4▕ }
console error: Uncaught (in promise) Error: A listener indicated an asynchronous response by returning true, but the message channel closed before a response was received
how can I get
Reverb configuration
REVERB_APP_ID= REVERB_APP_KEY= REVERB_APP_SECRET= REVERB_HOST="localhost" REVERB_PORT=8080 REVERB_SCHEME=http
should I let the reverb config as you show at github Repo or use my one and how to create it ?
Sorry, the formatting of the message is a bit messed up...
php artisan broadcasting:installcommand.As for why the UI would not update - as soon as you see the correctly named event apear in your WS console - you should see UI update. If that's not the case, check for js errors in browser console
I clonning the repo from github with regenerate key and install Composer at first and cp .env ...and all of this why the reverb not working and before use reverb also pusher was not working !!
Yes, but our .env.example does not have all values filled for the REVERB configuration, so they should be configured as needed :)
But if you also had issues with pusher before - then there might be something else wrong. Like a port being blocked or something else like that
I am sorry for many comments but I want to show you the new error i get at console , WebSocket connection to 'ws://localhost:8080/app/3prtjfbbgn54t6w8diu0?protocol=7&client=js&version=8.4.0-rc2&flash=false' failed:
If you have any ideas or solutions , thanks for laravel daily team
if anyone manages to get around the problems please let me know ❤️
This error message can mean A LOT of different things sadly, so it's hard to say what is happening there.
But from what I've learned:
If you are using docker/WSL2/windows setup - the whole reverb thing can become really tricky to get working. And sadly, I we don't have the solution for these problems... What I can suggest is - taking the whole setup from scratch and doing it like it's written in the documentation. Then adding the parts that are missing from our tutorial :) That sometimes helps people
Hi, Thanks for the example I have implemented using filament below code sends and displays broadcasted notification properly on the frontend but it is not saved on default notification database for later viewing like when using notification database method. how to save notifications to database when using broadcast method?
After some trial and erros I managed to do it, I hope it will be helpful to someone else
There is no need to add/pass the DIV with all the styling throug javascript.
You can have it all already on the page, just hidden. Then use Reverb/Websockets to just switch visibility, or pass some message and switch visibility.
Anyway, it's way more convenient to have your HTML/CSS on the HTML part of the page, rather than in JS.
i am facing this issue while running the command Pusher error: cURL error 28: Operation timed out after 30006 milliseconds with 0 bytes received (see https://curl.haxx.se/libcurl/c/libcurl-errors.html) for http://localhost:8080/apps/192749/events?auth_key=cgny6goqtw200yh15tvb&auth_timestamp=1727337534&auth_version=1.0&body_md5=07eed6f0f66bd806d259a3bc4b275b9b&auth_signature=260f16da1b4a2c2156ae8f8f979ea0e68d326dfd8bd87705264a40c2bc881f74.
Hello, I was trying the public notification. I was logged in as "Admin" and got the message with the date, everything ok. If i switch the user to "User1" for example and fire an new event over the console command i am not getting the message. I have to restart reverb and fire an event again to get the message.
What do i miss ?
Hmm, it should not be impacted by the connection.
When creating this article, I've tested the logging in/out workflows quite a few times and did not see an issue with this...
Have you tried running reverb in debug mode? Does it show the event?
Yes, i had de debug mode on and its not showing the message if i logged out and in as differnt user. But if use two diffren Browser (or private mode) and log in with two diffrent user it works. I see on the message on both browsern at the same time. I have to check what happen if i logout with one and login with a diffrent user on ohne of the browsern and leave the other logged in.
hello, i get same problem. when i try php artisan reverb:start --debug always showing {
2▕ "event": "pusher:subscribe",
3▕ "data": {
4▕ "auth": "",
5▕ "channel": "system-maintenance"
6▕ }
7▕ } I've tried looking for a solution like on stackoverflow and others but I still can't find it. Can you help explain to me what the cause is
I'm not sure what the issue is here. This seems normal, since as soon as you subscribe to a channel - this message should pop up.
and I run it with the command
app and reverb should be running on separate ports.
You could check network tab for any issues with wss connection
it is now up and running, i am using nginx and nginx.conf i added /ws to location location /ws { proxy_pass http://localhost:6001; # Change to your WebSocket server address proxy_http_version 1.1; proxy_set_header Upgrade $http_upgrade; proxy_set_header Connection "upgrade"; proxy_set_header Host $host; proxy_set_header X-Real-IP $remote_addr; proxy_set_header X-Forwarded-For $proxy_add_x_forwarded_for; proxy_set_header X-Forwarded-Proto $scheme; }
php artisan system:maintenance scheduled "14:30" "Server updates will be applied." Maintenance notification sent with status: scheduled
but no notification is there in the console nor the message is printing
Err: Uncaught (in promise) Error: redacted
please help me solve this sir
please answer to my query?