In this first lesson, I want to demonstrate Livewire in action, explaining the installation and syntax along the way.
Intro: The Project
Imagine you have a form with country/city dropdown fields:
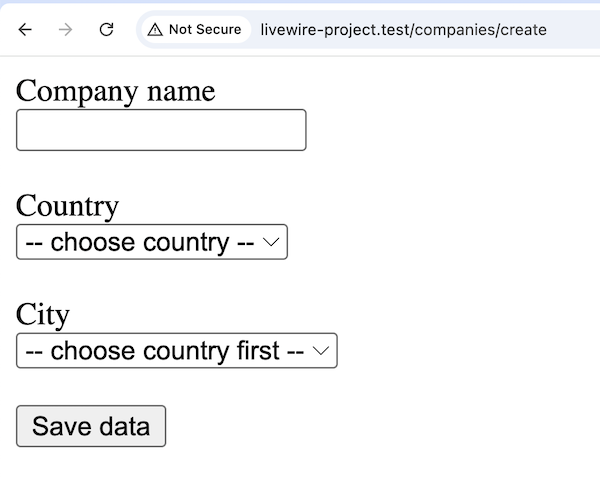
You want the form to be dynamic, so whenever a country is chosen, the city list will auto-reload with cities from that specific country.
Notice: I intentionally left out any CSS or design so we could focus on the functionality.
A typical way to do it would be with JavaScript and frameworks like Vue or React.
But Livewire allows you to achieve it without writing any line of JavaScript.
Let me show you.
If you want to follow along with the repository, the link to GitHub will be at the end of this lesson.
Code BEFORE Livewire
So, this is the initial code of Controller + Blade, without Livewire:
app/Http/Controllers/CompanyController.php:
namespace App\Http\Controllers; use App\Models\Country; class CompanyController extends Controller{ public function create() { $countries = Country::all(); return view('companies.create', compact('countries')); }}resources/views/companies/create.blade.php:
<html><body><form> <label for="name">Company name</label> <br /> <input name="name" required /> <br /><br /> <label for="country_id">Country</label> <br /> <select name="country_id" required> <option value="">-- choose country --</option> @foreach ($countries as $country) <option value="{{ $country->id }}">{{ $country->name }}</option> @endforeach </select> <br /><br /> <label for="city_id">City</label> <br /> <select name="city_id"> <option value="">-- choose country first --</option> </select> <br /><br /> <button type="submit">Save data</button></form> </body></html>Now, look at the code of dynamic dependent dropdowns with Livewire below.
Code WITH Livewire
First, we install Livewire. It's just one Composer command:
composer require livewire/livewireThen, we turn our form into a Livewire component that would be included in the regular Blade.
php artisan make:livewire CompanyCreateIt will generate two files:
- Livewire Component class: app/Livewire/CompanyCreate.php
- Livewire Blade file: resources/views/livewire/company-create.blade.php
Then, the main Laravel Blade turns into this, just loading the Livewire component for the form:
resources/views/companies/create.blade.php:
<html><body> <livewire:company-create /></body></html>And this is what the Livewire Component looks like.
app/Livewire/CompanyCreate.php
namespace App\Livewire; use App\Models\City;use App\Models\Country;use Livewire\Component; class CompanyCreate extends Component{ public $countries; public $country; public $cities = []; public function mount() { $this->countries = Country::all(); } public function render() { return view('livewire.company-create'); } public function updated($property) { if ($property == 'country') { $this->cities = City::where('country_id', $this->country)->get(); } } }This Component class above looks similar to a Laravel Controller, doesn't it?
Quick explanation:
- Method
mount()is like PHP constructor - Method
render()defines which Blade file to load - Method
updated()is fired whenever some input field changes the value
Then, Livewire Blade:
resources/views/livewire/company-create.blade.php:
<div> <form> <label for="name">Company name</label> <br /> <input name="name" required /> <br /><br /> <label for="country_id">Country</label> <br /> <select wire:model.live="country" required> <option value="">-- choose country --</option> @foreach ($countries as $country) <option value="{{ $country->id }}">{{ $country->name }}</option> @endforeach </select> <br /><br /> <label for="city_id">City</label> <br /> <select name="city_id"> @forelse($cities as $city) <option value="{{ $city->id }}">{{ $city->name }}</option> @empty <option value="">-- choose country first --</option> @endforelse </select> <br /><br /> <button type="submit">Save data</button> </form></div>It looks similar to a regular Laravel Blade, doesn't it?
As you can see, we have variables like $countries and $cities in the Blade, which are automatically passed from the properties of the Livewire Component class. We don't need to pass them.
Also, that wire:model means binding to the component property $country_id. We'll talk about that in the next lesson.
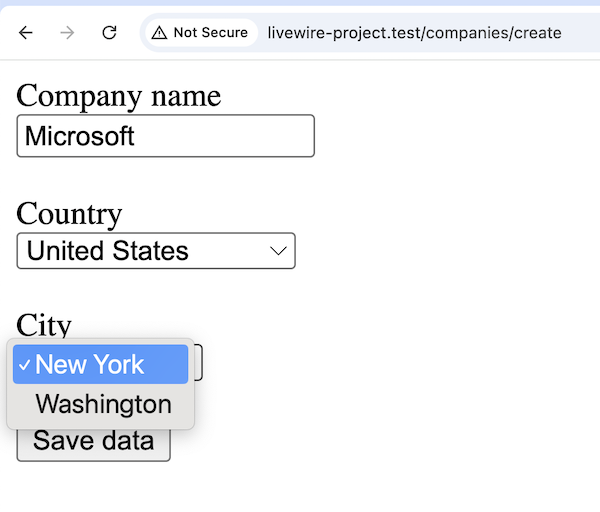
And that's it. The dynamic behavior works!
Main Points: Purpose of Livewire
With this demonstration, I wanted to show three main points:
- Livewire allows you to achieve dynamic pages without JavaScript
- Structurally, it looks similar to regular Laravel with PHP and Blade, so back-end developers stay productive in their "comfort zone".
- You can code your full page with regular Blade/MVC and use Livewire only for some page parts that you want to be dynamic, like a form in the example above
If you want to try this example yourself, here's a link to the GitHub repository.
In the next lesson, we will talk about submitting the form, which will happen without refreshing the full page.
slightly off topic but I've found MingleJS which appears to let you use React or Vue in a Livewire app.. will test it out this weekend and report back
thank you