Welcome to the course section where we explore the official Laravel 12 Livewire Starter Kit.
The goal of this section is to create a full CRUD on top of this starter kit, like this:

In this first lesson of the section, we will install Laravel with the Livewire starter kit and familiarize ourselves with its general structure and code.
If you want to follow along with the repository, the link to GitHub will be at the end of this lesson.
Installation
We install a new Laravel project and will choose the Livewire starter kit:
laravel new laravel
We stay with the default values for all the other choices in the wizard, except for the Volt option, where I will choose No.
As a result, we have a regular Laravel homepage with "Log in" and "Register" links at the top.

When we register as a new user, we land on an empty dashboard with a sidebar.

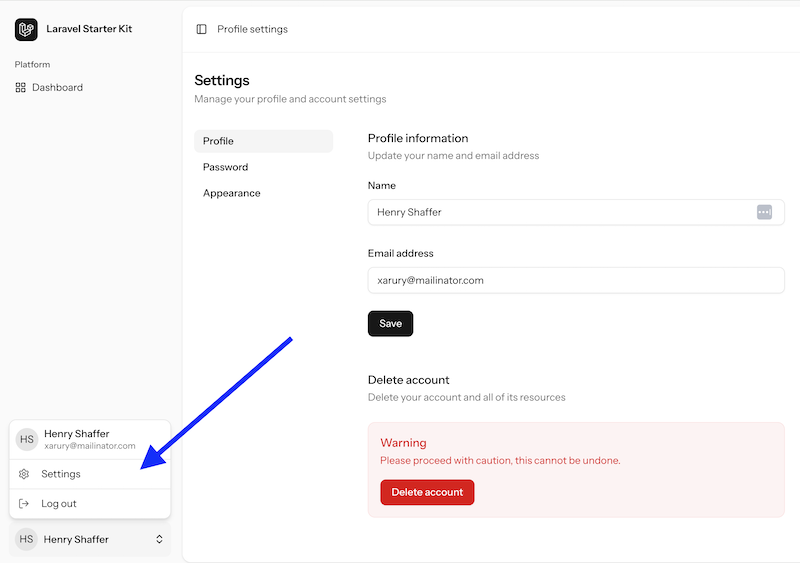
In addition to the layout, we have the "Settings" menu item that allows user profile data:
So yeah, that's all about installation! Simple, huh? Now, let's see what's inside the code.
Project Code Structure: Back-End
I typically start analyzing any Laravel project with Routes.
routes/web.php:
Route::get('/', function () { return view('welcome');})->name('home'); Route::view('dashboard', 'dashboard') ->middleware(['auth', 'verified']) ->name('dashboard'); Route::middleware(['auth'])->group(function () { Route::redirect('settings', 'settings/profile'); Route::get('settings/profile', Profile::class)->name('settings.profile'); Route::get('settings/password', Password::class)->name('settings.password'); Route::get('settings/appearance', Appearance::class)->name('settings.appearance');}); require __DIR__.'/auth.php';Nothing special here, right? Regular routes, and included route file for the auth routes.
If we look at the Settings Livewire component, we can see familiar PHP code.
One familiar Livewire method that you won't find is render(). When a render() method isn't provided, Livewire looks for a Blade file in the same path it is created and for the same Blade file name as the component, so resources/views/livewire/settings/profile.blade.php.
app/Livewire/Settings/Profile.php:
use App\Models\User;use Illuminate\Support\Facades\Auth;use Illuminate\Support\Facades\Session;use Illuminate\Validation\Rule;use Livewire\Component; class Profile extends Component{ public string $name = ''; public string $email = ''; /** * Mount the component. */ public function mount(): void { $this->name = Auth::user()->name; $this->email = Auth::user()->email; } /** * Update the profile information for the currently authenticated user. */ public function updateProfileInformation(): void { $user = Auth::user(); $validated = $this->validate([ 'name' => ['required', 'string', 'max:255'], 'email' => [ 'required', 'string', 'lowercase', 'email', 'max:255', Rule::unique(User::class)->ignore($user->id), ], ]); $user->fill($validated); if ($user->isDirty('email')) { $user->email_verified_at = null; } $user->save(); $this->dispatch('profile-updated', name: $user->name); } /** * Send an email verification notification to the current user. */ public function resendVerificationNotification(): void { $user = Auth::user(); if ($user->hasVerifiedEmail()) { $this->redirectIntended(default: route('dashboard', absolute: false)); return; } $user->sendEmailVerificationNotification(); Session::flash('status', 'verification-link-sent'); }}Project Code Structure: Front-End
Let's look at what's inside that Blade file for the Settings Livewire component.
resources/views/livewire/settings/profile.blade.php:
<section class="w-full"> @include('partials.settings-heading') <x-settings.layout :heading="__('Profile')" :subheading="__('Update your name and email address')"> <form wire:submit="updateProfileInformation" class="my-6 w-full space-y-6"> <flux:input wire:model="name" :label="__('Name')" type="text" required autofocus autocomplete="name" /> <div> <flux:input wire:model="email" :label="__('Email')" type="email" required autocomplete="email" /> @if (auth()->user() instanceof \Illuminate\Contracts\Auth\MustVerifyEmail &&! auth()->user()->hasVerifiedEmail()) <div> <flux:text class="mt-4"> {{ __('Your email address is unverified.') }} <flux:link class="text-sm cursor-pointer" wire:click.prevent="resendVerificationNotification"> {{ __('Click here to re-send the verification email.') }} </flux:link> </flux:text> @if (session('status') === 'verification-link-sent') <flux:text class="mt-2 font-medium !dark:text-green-400 !text-green-600"> {{ __('A new verification link has been sent to your email address.') }} </flux:text> @endif </div> @endif </div> <div class="flex items-center gap-4"> <div class="flex items-center justify-end"> <flux:button variant="primary" type="submit" class="w-full">{{ __('Save') }}</flux:button> </div> <x-action-message class="me-3" on="profile-updated"> {{ __('Saved.') }} </x-action-message> </div> </form> <livewire:settings.delete-user-form /> </x-settings.layout></section>For now, notice the main things:
- Laravel starter kits uses Blade components like
x-action-messagefor reusing elements. You can find them in theresources/views/componentsfolder. - The design elements are taken from Flux component library created by the same Caleb Porzio, author of Livewire. It has a PRO version, but some of Flux components became free and were open-sourced with Laravel 12 release, to be used in this Starter Kit.
- The main page structure is in
resources/views/components/layouts/app.blade.php.
And this is exactly our next step for the next lesson: customizing the layout.
The repository for this starter kit project section is here on GitHub.
No comments yet…