In the following lessons, we will fill our "Tasks" page with the full CRUD. Let's start with a table.
Table Component from Shadcn
Let's show the table of tasks. Remember, we had seeded it into the database previously:

React starter kit uses a React+Tailwind Shadcn UI library so you don't need to install it, it comes already pre-configured.
Generally, using Shadcn components is very easy:
- Install the component with
npx - Import it on top of your React file
- Use it inside your React file
return ( )section
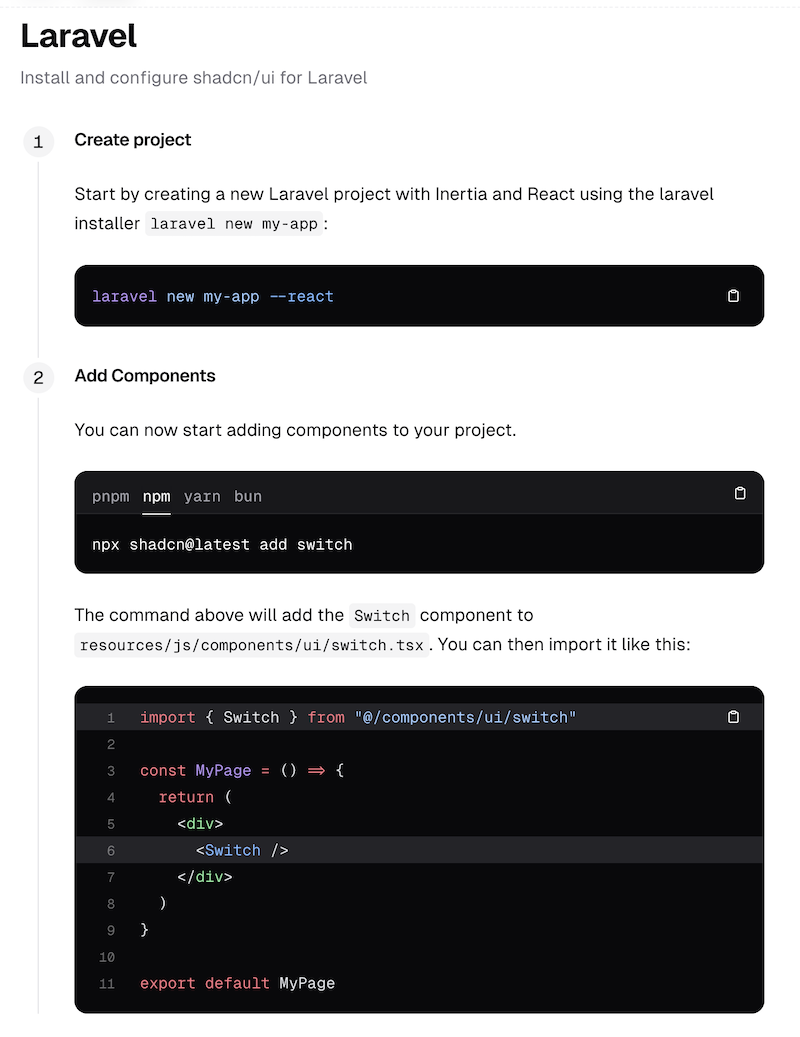
Here's the screenshot from the official Shadcn docs for Laravel.
Shadcn has many components:

For this example, we will use Table component, follow its documentation and apply it to our Tasks List page.
Shadcn components are installed with the npx command and then should be imported on top of our React .tsx file.
npx shadcn@latest add tableThis will add a new file resources/js/components/ui/table.tsx which we don't need to edit. We will just use the table components from there.
However, Shadcn emphasizes it as one of its strongest features: the Open Code. It means that components are not in node_modules or vendor. They are in your resources/js/components/ui/ folder, and you can modify the styling if you wish to.
Now, let's use the <Table> component. Here's the screenshot from the official docs:

So, let's try to repeat exactly that. For now, let's build the static table with hard-coded two rows.
resources/js/pages/Tasks/Index.tsx:
import AppLayout from '@/layouts/app-layout';import { Head } from '@inertiajs/react';import { Table, TableBody, TableCell, TableHead, TableHeader, TableRow,} from "@/components/ui/table" export default function Index() { return ( <AppLayout> <Head title="Tasks List" /> <div> // ... <Table className={'mt-4'}> <TableHeader> <TableRow> <TableHead>Task</TableHead> <TableHead className="w-[100px]">Status</TableHead> <TableHead className="w-[150px] text-right">Actions</TableHead> </TableRow> </TableHeader> <TableBody> <TableRow> <TableCell> Task names will be here </TableCell> <TableCell> Completed or in progress </TableCell> </TableRow> </TableBody> </Table> </div> </AppLayout> );We have our table!

Now, let's add actual data to it.
Tasks: Controller to TypeScript Interface/Type
Remember what we have in the Controller:
app/Http/Controllers/TaskController.php:
public function index(){ return Inertia::render('Tasks/Index', [ 'tasks' => Task::all(), ]);}So, we pass the tasks variable to the React component.
Now, let's get familiar with TypeScript and create a Task type. Then, our React component would have IDE auto-complete and strict validation, so that no incorrect data could be passed.
These are the main two goals of TypeScript, similar to how strict types became more popular in PHP.
For defining types, we have this file, already pre-filled by the starter kit:
resources/js/types/index.d.ts:
import { LucideIcon } from 'lucide-react';import type { Config } from 'ziggy-js'; export interface Auth { user: User;} export interface BreadcrumbItem { title: string; href: string;} export interface NavGroup { title: string; items: NavItem[];} export interface NavItem { title: string; href: string; icon?: LucideIcon | null; isActive?: boolean;} // ...Remember the NavItem? We have already used it, right?
Yes, while adding the new menu to the navigation:
const mainNavItems: NavItem[] = [ { title: 'Dashboard', href: '/dashboard', icon: LayoutGrid, }, { title: 'Tasks', href: '/tasks', icon: BriefcaseIcon, },];See that NavItem[] here? It means that this array of mainNavItems is not just any array. It's an array where each element is of the type of NavItem.
This way, other developers won't make typos in the title / url / icon structure. TypeScript will enforce those fields and throw errors otherwise.
So, we add our own interface to the same file:
resources/js/types/index.d.ts:
export interface NavItem { title: string; href: string; icon?: LucideIcon | null; isActive?: boolean;} // ... export interface Task { id: number; name: string; is_completed: boolean; created_at: string; updated_at: string;} Then, we can pass our tasks object from the Controller and accept the typed array in the React component.
resources/js/pages/Tasks/Index.tsx:
export default function Index({ tasks }: { tasks: Task[] }) { return ( // ...This syntax tasks: Task[] defines that your component accepts the array of tasks where each element is of type Task.
Real Tasks in the Table
Now, let's use the tasks in our table and build a loop instead of the hard-coded rows. In React, we will use the map() method for it.
resources/js/pages/Tasks/Index.tsx:
BEFORE:
<TableBody> <TableRow> <TableCell> First task </TableCell> <TableCell> Completed </TableCell> <TableCell> Edit/Delete buttons will be here </TableCell> </TableRow> <TableRow> <TableCell> Second task </TableCell> <TableCell> In progress </TableCell> <TableCell> Edit/Delete buttons will be here </TableCell> </TableRow></TableBody>AFTER:
<TableBody> {tasks.map((task) => ( <TableRow key={task.id}> <TableCell>{task.name}</TableCell> <TableCell className={task.is_completed ? 'text-green-600' : 'text-red-700'}> {task.is_completed ? 'Completed' : 'In Progress'} </TableCell> </TableRow> ))}</TableBody>The map() method is a React/JS way to render an array list, equivalent to PHP foreach loop. You can read more about rendering lists in the React documentation.
And here's the visual result:

Is Using TypeScript a Requirement?
Similarly to PHP type-hinting and return types, TypeScript is totally optional. It may be added "on top" of general React/Vue components to enforce strictness. Laravel 12 starter kits and Shadcn library both use TypeScript, and people on Reddit choose TypeScript over JavaScript, but you don't have to.
Some of you may not like that extra step of defining types. No problem, feel free to create your future React components in regular JavaScript, without TypeScript. The Laravel starter kit includes the first types, but you don't have to continue this and create new types.
In that case, you just don't add anything to the resources/js/types/index.d.ts, and your React component code is this:
import { Task } from '@/types'; // ... export default function Index({ tasks }: { tasks: Task[] }) { export default function Index({ tasks }) { Keep in mind that you may get IDE warnings that the tasks variable now has the any type.

It's logical: the file extension is .tsx, so TypeScript will check and try to enforce the types everywhere. But no worries, the table will still work well.
You could technically even rename the file to Index.jsx, but the problem is that you import components from TypeScript files: app-layout.tsx and table.tsx (Shadcn uses TypeScript, too), so the .jsx extension in your file would break the functionality.
So, if you want to proceed without TypeScript in your project, feel free to do it, but still choose the extension of .tsx for your future React components.
Great, we have our table with data.
Here are the GitHub commits: first and second for this lesson.
In the following lessons, we'll take care of the Delete action.
Hi,
In the first code to demonstrate the use of the table component, you have the following,
<TableRow key={task.id}>This will trip beginners who are just following along. At this point, task does not exist and any attempt to load the page will result in error. I was able to resolve this because I am experienced, people new the dev or react will likely stumble over this.
Great notice! Fixed it in the lesson right away, thanks!