Firstly for a user to be able to order parking in a particular zone they must be able to add their owned vehicles. In this lesson, we will start to implement our first CRUD. When a user is registered or logged in he will be redirected to the vehicles.index page. Yet we have only a placeholder for the vehicles list because we do not have any vehicles stored and need to create some first.

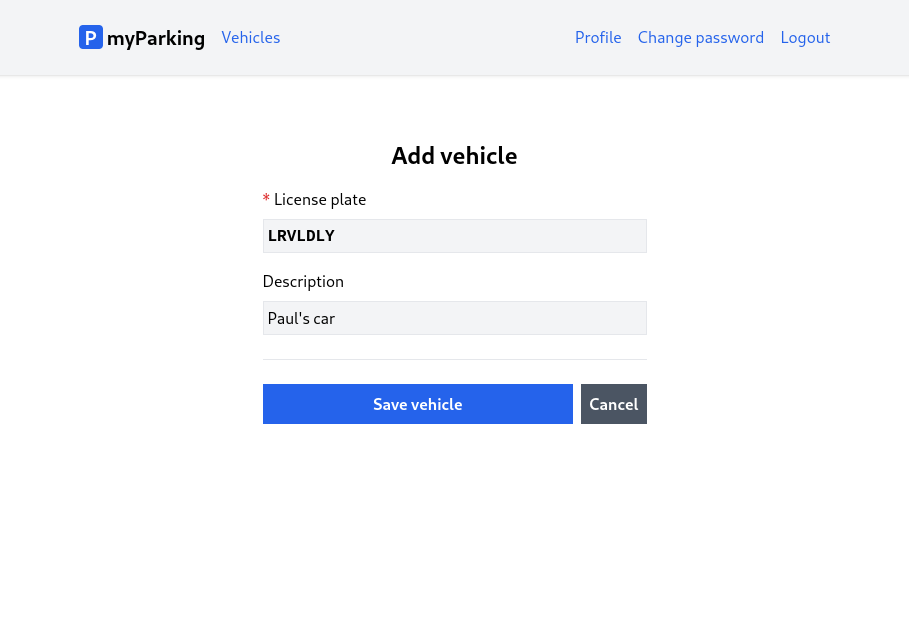
And the form to add a vehicle will look like this. After pressing the Save vehicle form is submitted to the server and then redirected back to the list. Pressing the Cancel redirect will immediately disregard the form without submitting it.
1. New Store
Create a new src/stores/vehicle.js store with the following content.
import { reactive, ref } from "vue";import { defineStore } from "pinia";import { useRouter } from "vue-router"; export const useVehicle = defineStore("vehicle", () => { const router = useRouter(); const errors = reactive({}); const loading = ref(false); const form = reactive({ plate_number: "", description: "", }); function resetForm() { form.plate_number = ""; form.description = ""; errors.value = {}; } function storeVehicle() { if (loading.value) return; loading.value = true; errors.value = {}; window.axios .post("vehicles", form) .then(() => { router.push({ name: "vehicles.index" }); }) .catch((error) => { if (error.response.status === 422) { errors.value = error.response.data.errors; } }) .finally(() => (loading.value = false)); } return { form, errors, loading, resetForm, storeVehicle };});Store contents are very similar to the other ones, except we have imported the useRouter() function to be able to navigate to the index page after successfully saving the form.
import { useRouter } from "vue-router"; // ... const router = useRouter(); // ... function storeVehicle() { // ... window.axios .post("vehicles", form) .then(() => { router.push({ name: "vehicles.index" }); }) //...2. New Component
Create a new src/views/Vehicles/CreateView.vue component.
<script setup>import { onBeforeUnmount } from "vue";import { useVehicle } from "@/stores/vehicle"; const store = useVehicle(); onBeforeUnmount(store.resetForm);</script> <template> <form @submit.prevent="store.storeVehicle" novalidate> <div class="flex flex-col mx-auto md:w-96 w-full"> <h1 class="text-2xl font-bold mb-4 text-center">Add vehicle</h1> <div class="flex flex-col gap-2 mb-4"> <label for="plate_number" class="required">License plate</label> <input v-model="store.form.plate_number" id="plate_number" name="plate_number" type="text" class="form-input plate" :disabled="store.loading" /> <ValidationError :errors="store.errors" field="plate_number" /> </div> <div class="flex flex-col gap-2"> <label for="description">Description</label> <input v-model="store.form.description" id="description" name="description" type="text" class="form-input" placeholder="My Ferrari, Big truck, Rental" :disabled="store.loading" /> <ValidationError :errors="store.errors" field="description" /> </div> <div class="border-t h-[1px] my-6"></div> <div class="flex gap-2"> <button type="submit" class="btn btn-primary w-full" :disabled="store.loading" > <IconSpinner class="animate-spin" v-show="store.loading" /> Save vehicle </button> <RouterLink :to="{ name: 'vehicles.index' }" class="btn btn-secondary"> Cancel </RouterLink> </div> </div> </form></template>To display the license plate in monospaced bold uppercase font, we added a separate CSS class named plate. It will be used throughout the demo app.
For the cancel button, we wrap both buttons with <div class="flex gap-2"> to let flexbox do all the positioning and spacing for us. The cancel button itself is a <RouterLink /> component from Vue Router. We already used that component for top bar navigation except it has btn btn-secondary classes. And for the button, the w-full class was added to be as wide as much space we have.
<div class="flex gap-2"> <button type="submit" class="btn btn-primary w-full" :disabled="store.loading" > <IconSpinner class="animate-spin" v-show="store.loading" /> Save vehicle </button> <RouterLink :to="{ name: 'vehicles.index' }" class="btn btn-secondary"> Cancel </RouterLink></div>3. Classes in The Main CSS
Now let's define those plate and btn-secondary classes in the src/assets/main.css file.
.btn-secondary { @apply text-white bg-gray-600 hover:bg-gray-500;} .plate { @apply font-mono font-bold uppercase;}Full contents of src/assets/main.css now should look like this.
@tailwind base;@tailwind components;@tailwind utilities; @layer components { label.required { @apply before:text-red-600 before:content-['*'] before:mr-1; } .form-input { @apply p-1 border bg-gray-100 disabled:opacity-50; } .btn { @apply inline-flex items-center gap-2 justify-center p-2 font-bold relative disabled:!opacity-50 disabled:!cursor-progress; } .btn-primary { @apply text-white bg-blue-600 hover:bg-blue-500; } .btn-secondary { @apply text-white bg-gray-600 hover:bg-gray-500; } .router-link { @apply text-blue-600 hover:underline; } .router-link-active.router-link { @apply underline; } .alert { @apply border px-4 py-3 rounded relative; } .alert-success { @apply text-green-700 bg-green-100 border-green-400 } .plate { @apply font-mono font-bold uppercase; }}4. Register the Component
Register the CreateView.vue component in the routes file src/router/index.js.
{ path: "/vehicles/create", name: "vehicles.create", beforeEnter: auth, component: () => import("@/views/Vehicles/CreateView.vue"),},Route definitions src/router/index.js have the following content.
import { createRouter, createWebHistory } from "vue-router"; function auth(to, from, next) { if (!localStorage.getItem("access_token")) { return next({ name: "login" }); } next();} function guest(to, from, next) { if (localStorage.getItem("access_token")) { return next({ name: "vehicles.index" }); } next();} const router = createRouter({ history: createWebHistory(import.meta.env.BASE_URL), routes: [ { path: "/", name: "home", component: import("@/views/HomeView.vue"), }, { path: "/register", name: "register", beforeEnter: guest, component: () => import("@/views/Auth/RegisterView.vue"), }, { path: "/login", name: "login", beforeEnter: guest, component: () => import("@/views/Auth/LoginView.vue"), }, { path: "/profile", name: "profile.edit", beforeEnter: auth, component: () => import("@/views/Profile/EditView.vue"), }, { path: "/profile/change-password", name: "profile.change-password", beforeEnter: auth, component: () => import("@/views/Profile/ChangePassword.vue"), }, { path: "/vehicles", name: "vehicles.index", beforeEnter: auth, component: () => import("@/views/Vehicles/IndexView.vue"), }, { path: "/vehicles/create", name: "vehicles.create", beforeEnter: auth, component: () => import("@/views/Vehicles/CreateView.vue"), }, ],}); export default router;5. Display The Button
Now we can update the src/views/Vehicles/IndexView.vue component to display the button to the create form.
<template> <div class="flex flex-col mx-auto md:w-96 w-full"> <h1 class="text-2xl font-bold mb-4 text-center">My vehicles</h1> <RouterLink :to="{ name: 'vehicles.create' }" class="btn btn-primary w-full" > Add vehicle </RouterLink> <div class="border-t h-[1px] my-6"></div> <div>There will be our vehicles list.</div> </div></template>When you save the vehicle you will be redirected to the index page and no list is displayed yet. On the database vehicles table you should see a new record.

Let's move forward to the next lesson, and display the vehicles list on the client.
I think using a router inside a store is quite bad practice. Actions is place only for business logic. What if you add a new way to add vehicles like a popup on "vehicle.index"
I think you haven't added a description in the vehicles table (//lesson/build-laravel-api-step-by-step/manage-vehicles), but no problem, I can add it.
I ran into the same problem. As you noted, super-easy to add.