In order to be able to book parking in a specific zone, the user must first add their own vehicles. This lesson will focus on implementing the first CRUD operation.
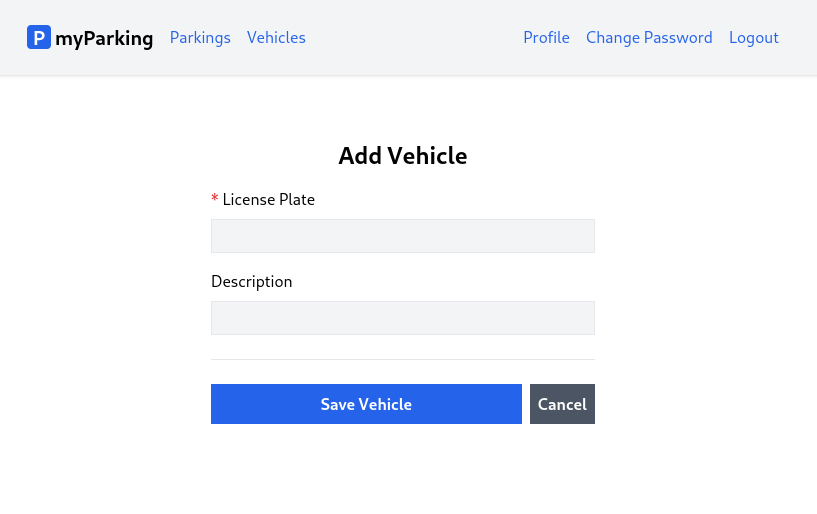
And the form to add a vehicle will look like this. After pressing the Save Vehicle button form is submitted to the server and then redirected back to the list. Pressing the Cancel button redirect will discard the form data without submitting it and will redirect back to the list.
- Create a new
src/hooks/useVehicle.jsxhook.
import { useState } from 'react'import { useNavigate } from 'react-router-dom'import { route } from '@/routes' export function useVehicle() { const [errors, setErrors] = useState({}) const [loading, setLoading] = useState(false) const [data, setData] = useState({}) const navigate = useNavigate() function createVehicle(data) { setLoading(true) setErrors({}) return axios.post('vehicles', data) .then(() => navigate(route('vehicles.index'))) .catch(error => { if (error.response.status === 422) { setErrors(error.response.data.errors) } }) .finally(() => setLoading(false)) } return { vehicle: { data, setData, errors, loading }, createVehicle, }}- Create a new
src/views/vehicles/CreateVehicle.jsxcomponent.
import { useNavigate } from 'react-router-dom'import { useVehicle } from '@/hooks/useVehicle'import { route } from '@/routes'import ValidationError from '@/components/ValidationError'import IconSpinner from '@/components/IconSpinner' function CreateVehicle() { const { vehicle, createVehicle } = useVehicle() const navigate = useNavigate() async function handleSubmit(event) { event.preventDefault() await createVehicle(vehicle.data) } return ( <form onSubmit={ handleSubmit } noValidate> <div className="flex flex-col mx-auto md:w-96 w-full"> <h1 className="heading">Add Vehicle</h1> <div className="flex flex-col gap-2 mb-4"> <label htmlFor="plate_number" className="required">License Plate</label> <input id="plate_number" name="plate_number" type="text" value={ vehicle.data.plate_number ?? '' } onChange={ event => vehicle.setData({ ...vehicle.data, plate_number: event.target.value, }) } className="form-input plate" disabled={ vehicle.loading } /> <ValidationError errors={ vehicle.errors } field="plate_number" /> </div> <div className="flex flex-col gap-2"> <label htmlFor="description">Description</label> <input id="description" name="description" type="text" value={ vehicle.data.description ?? '' } onChange={ event => vehicle.setData({ ...vehicle.data, description: event.target.value, }) } className="form-input" disabled={ vehicle.loading } /> <ValidationError errors={ vehicle.errors } field="email" /> </div> <div className="border-t h-[1px] my-6"></div> <div className="flex items-center gap-2"> <button type="submit" className="btn btn-primary w-full" disabled={ vehicle.loading } > { vehicle.loading && <IconSpinner /> } Save Vehicle </button> <button type="button" className="btn btn-secondary" disabled={ vehicle.loading } onClick={ () => navigate(route('vehicles.index')) } > <span>Cancel</span> </button> </div> </div> </form> )} export default CreateVehicleFor the cancel action, we created a regular button with the type="button" attribute, and added an onClick handler with an anonymous function to navigate to the vehicles.index named route.
<button type="button" className="btn btn-secondary" disabled={ vehicle.loading } onClick={ () => navigate(route('vehicles.index')) }> <span>Cancel</span></button>We didn't use Link or NavLink for this purpose because they don't support the disabled property and we want to prevent cancel action while the form is being processed.
- Add a new named route
'vehicles.create': '/vehicles/create',in thesrc/routes/index.jsxfile.
const routeNames = { 'home': '/', 'register': '/register', 'login': '/login', 'profile.edit': '/profile', 'profile.change-password': '/profile/change-password', 'vehicles.index': '/vehicles', 'vehicles.create': '/vehicles/create', 'parkings.active': '/parkings/active',}- Update
src/main.jsxby importing the newly created component.
import CreateVehicle from '@/views/vehicles/CreateVehicle'and defining a route for it
<Route path={ route('vehicles.create') } element={<CreateVehicle />} />- Finally update
src/views/vehicles/VehiclesList.jsxwith the following content to have a link to thevehicles.createform.
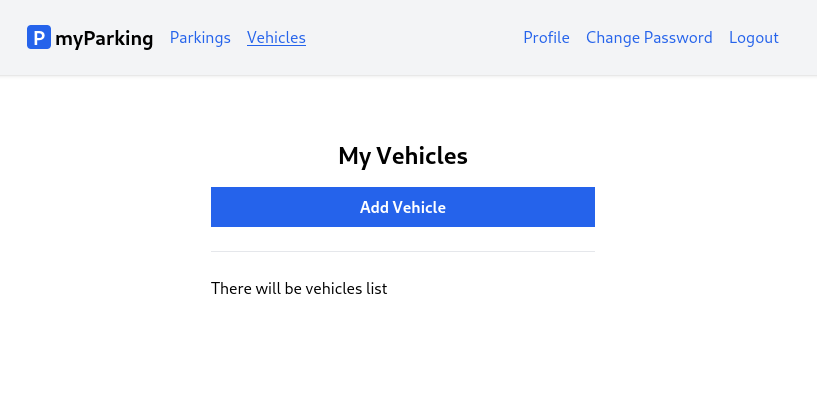
import { Link } from 'react-router-dom'import { route } from '@/routes' function VehiclesList() { return ( <div className="flex flex-col mx-auto md:w-96 w-full"> <h1 className="heading">My Vehicles</h1> <Link to={ route('vehicles.create') } className="btn btn-primary"> Add Vehicle </Link> <div className="border-t h-[1px] my-6"></div> <div>There will be vehicles list</div> </div> )} export default VehiclesListLet's move forward to the next lesson and display the vehicles list on the client.
Either its me or did the description field forgot to be added from the Laravel API Lesson?
Hi, not sure I understood what you have in mind here. Can you explain a little bit more?
Yeah, thank you for answering. In the Laravel API tutorial connected to this lesson, the Vehicle Model didnt include the description field. I tried looking back to see if it was somthing I missed, but I do not believe so.
Okay, now this makes sense. Will see if we can update this.
Thank you!