In this lesson, when a user submits the form, we are going to indicate if the form is being processed to give the user some feedback to have a more pleasant user experience.
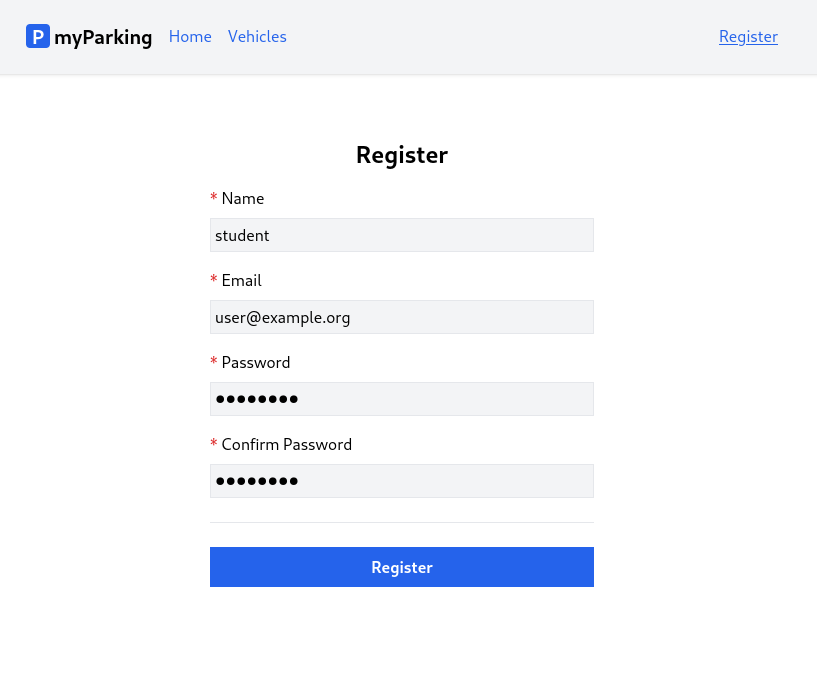
Before submit:
Right after the form is submitted and the client waits for a response:
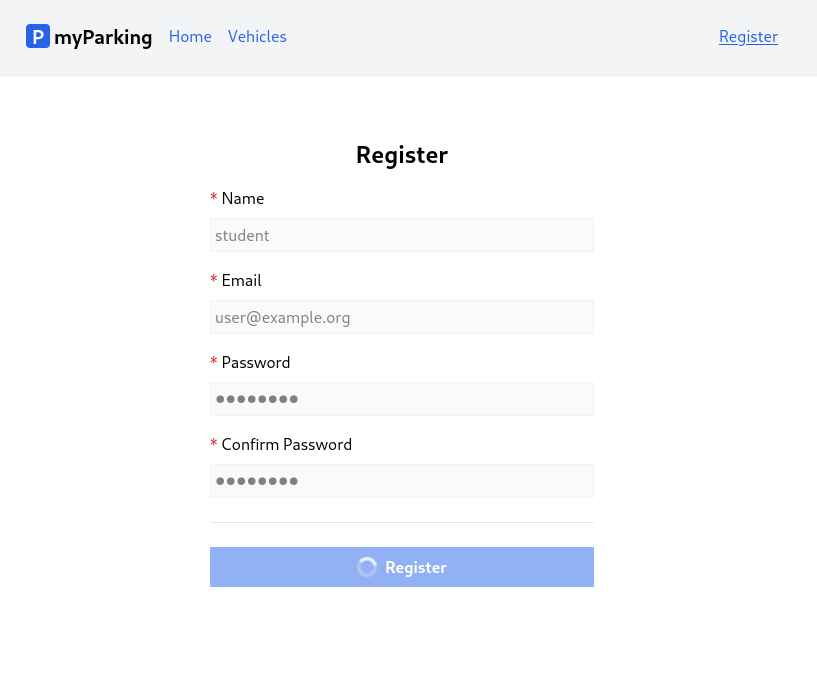
- By looking at the result we can immediately see that there is a new thing in the form, it is a loading indicator on the button.
Create a new component src/components/IconSpinner.jsx with the following content.
function IconSpinner() { return <svg className="animate-spin h-5 w-5 text-white" xmlns="http://www.w3.org/2000/svg" fill="none" viewBox="0 0 24 24" > <circle className="opacity-25" cx="12" cy="12" r="10" stroke="currentColor" strokeWidth="4" ></circle> <path className="opacity-75" fill="currentColor" d="M4 12a8 8 0 018-8V0C5.373 0 0 5.373 0 12h4zm2 5.291A7.962 7.962 0 014 12H0c0 3.042 1.135 5.824 3 7.938l3-2.647z" ></path> </svg>} export default IconSpinnerThis component consists of an SVG icon and some TailwindCSS classes. animate-spin class applies persistent rotation animation on the icon.
- Let's update the
src/hooks/useAuth.jsxhook by adding a loading state.
import { useState } from 'react'import { useNavigate } from 'react-router-dom'import { route } from '@/routes' export function useAuth() { const [errors, setErrors] = useState({}) const [loading, setLoading] = useState(false) const navigate = useNavigate() async function register(data) { setErrors({}) setLoading(true) return axios.post('auth/register', data) .then(() => { navigate(route('vehicles.index')) }) .catch(error => { if (error.response.status === 422) { setErrors(error.response.data.errors) } }) .finally(() => setLoading(false)) } return { register, errors, loading }}At the beginning of the register function, we call setLoading(true) to update the state. In the finally() block we set the loading state back to false. finally() will be called always, even if the request failed.
And added loading to the return statement.
- Now we can do the final changes to the
src/views/auth/Register.jsxcomponent.
Import the IconSpinner component.
import IconSpinner from '@/components/IconSpinner'Unpack the loading state from the useAuth hook.
const { register, errors, loading } = useAuth()Add disabled property to every input field.
<input // ... disabled={ loading }/>The disabled property will be applied to input tags only if the loading state evaluates to true.
Also, update the button.
<button type="submit" className="btn btn-primary" disabled={ loading }> { loading && <IconSpinner /> } Register</button>Your components will often need to display different things depending on different conditions. In our case to display IconSpinner only when the loading state is true, we can use AND operator &&. This is a common shortcut inside React components, it often comes up when you want to render some JSX when the condition is true, or render nothing otherwise.
Currently our Register component src/views/auth/Register.jsx should look like this.
import { useState } from 'react'import { useAuth } from '@/hooks/useAuth'import ValidationError from '@/components/ValidationError'import IconSpinner from '@/components/IconSpinner' function Register() { const [name, setName] = useState('') const [email, setEmail] = useState('') const [password, setPassword] = useState('') const [passwordConfirmation, setPasswordConfirmation] = useState('') const { register, errors, loading } = useAuth() async function handleSubmit(event) { event.preventDefault() await register({ name, email, password, password_confirmation: passwordConfirmation }) setPassword('') setPasswordConfirmation('') } return ( <form onSubmit={ handleSubmit } noValidate> <div className="flex flex-col mx-auto md:w-96 w-full"> <h1 className="heading">Register</h1> <div className="flex flex-col gap-2 mb-4"> <label htmlFor="name" className="required">Name</label> <input id="name" name="name" type="text" value={ name } onChange={ event => setName(event.target.value) } className="form-input" autoComplete="name" disabled={ loading } /> <ValidationError errors={ errors } field="name" /> </div> <div className="flex flex-col gap-2 mb-4"> <label htmlFor="email" className="required">Email</label> <input id="email" name="email" type="email" value={ email } onChange={ event => setEmail(event.target.value) } className="form-input" autoComplete="email" disabled={ loading } /> <ValidationError errors={ errors } field="email" /> </div> <div className="flex flex-col gap-2 mb-4"> <label htmlFor="password" className="required">Password</label> <input id="password" name="password" type="password" value={ password } onChange={ event => setPassword(event.target.value) } className="form-input" autoComplete="new-password" disabled={ loading } /> <ValidationError errors={ errors } field="password" /> </div> <div className="flex flex-col gap-2"> <label htmlFor="password_confirmation" className="required">Confirm Password</label> <input id="password_confirmation" name="password_confirmation" type="password" value={ passwordConfirmation } onChange={ event => setPasswordConfirmation(event.target.value) } className="form-input" autoComplete="new-password" disabled={ loading } /> </div> <div className="border-t h-[1px] my-6"></div> <div className="flex flex-col gap-2 mb-4"> <button type="submit" className="btn btn-primary" disabled={ loading }> { loading && <IconSpinner /> } Register </button> </div> </div> </form> )} export default RegisterQ: I submit the registration form but can't see the loading state, what to do?
A:
This is normal especially if you work in the local environment, there are several options to trigger the loading state, the easiest ones are:
- You can just change the
const [loading, setLoading] = useState(false)default value fromfalsetotrueand refresh the page. Your form immediately will be in a loading state. - To imitate network latency you can add
sleep(3)at the beginning of your APIRegisterControllerto delay the response for 3 seconds. Only if you're working locally and do not forget to remove it.
Congratulations, now you know how to implement the most commonly used practices using forms.
Let's dive into authentication scaffolding.
Another way to see all your loading state is using the the dev tools of your browser in my case Chrome. Let me describe how it works.
This way you'll simulate an slow connection and you can see your loading states into your application.
When you finish, put again No throtting.
Besides Julian's approach, there's still another way to emulate delay in operations, but for client-side (in an async function): Awaiting a Promise that resolves in a
setTimeoutcallback.